
I run a QNAP NAS in my house to handle basic things like backups, torrent downloading, and an OpenVPN Client/Server so my brother can occasionally remote into the network and perform maintenance on our FalconPi christmas light controller.
The model that I have (TS-212) has aged pretty well but it doesn’t seem to receive updates anymore and the UI is extremely slow. What does work really well though is the networked storage. I have 2, 2 Tb HDDs in a RAID 1 configuration and am extremely happy with the performance and reliability.
Rather than replace the entire NAS, I decided to keep using it for storage and find another solution to host all of my various utilities. Kubernetes really appealed to me because of how versatile it is. When I went to Cloud Native Conf last year, I learned about K3s which is a product offering from Rancher that allows you to easily deploy kubernetes on a Raspberry PI. I decided this was the route I would go and began pieceing together a plan.
The Hardware
The Raspberry PI 4B+ is a pretty powerful device so starting out, I decided to just get 2 of them. I made sure to purchase the version with 4Gb of ram so that there was enough space for multiple containers on each one. I also wanted to reduce the amount of wires I would need to set this up. Raspberry PI 4 supports PoE natively with a hat. I thought that would be a pretty cool approach since all I would need now is Ethernet cables to wire everything up.
Going the PoE route, I would now need a switch that supports it. They aren’t too much more expensive than a standard switch but it’s goot to remember to look out for that specific feature.
If you are building your own cluster and want to save a bit of money, you can skip the PoE hats and just use USB-C Power adapters with a standard switch.
It’s important to get high quality SD Cards when using a Raspberry PI. I went with the Sandisk Extreme Pro 128Gb Cards. They aren’t that much more money compared to the cheaper models but provide a signifigant performance boost.
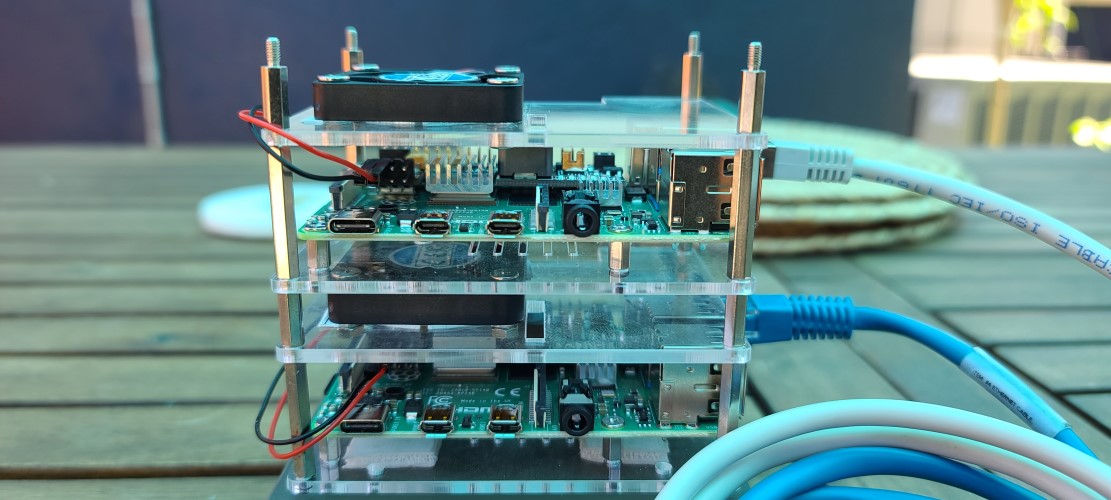
The last component of this build you will need is a case. I chose the MicroConnectors Acrylic Stackable Raspberry Pi case. It allows you to mount up to 4 Raspberry Pi’s and comes with fans and heatsinks.
If you are building your own, here is a list you can go off
-
2 x Raspberry Pi 4 Model B 2019 Quad Core 64 Bit WiFi Bluetooth (4GB)
-
2 x SanDisk Extreme Pro SDXC UHS-I U3 A2 V30 128GB + Adapter
If you don’t have some Cat 5e/6 ether netcables at home, I recommend these ones to keep your setup clean.
Assembling Everything
Assembly of the devices are pretty easy. The case is also built in sections so you build the first section of pi/fan and then continue stacking them.
Here are the steps to follow if you are using the PoE hat. If you are just using usb-C for power, you can follow the normal case assembly instructions.
- Follow the case instructions for Steps
1,2, and3. Be sure to skip adding the heatsink for the RAM since the hat will overlap that space. In my case, I didn’t expect to be doing anything too Ram intensive that would warrant the absolute need to a RAM heatsink.If you expect to be taxing your RAM, using PoE might not be the best route for you due to being unable to mount the heatsink.
-
For steps
4and5, you will need to flip the fan so it is on top of the top panel instead of under it but make sure it still if facing the same direction (blowing away from the board). The hat will not clear the fan and you won’t be able to assemble the case. -
On step
8, because of the PoE hat, you won’t be able to connect the fan to the normal pins. The hat does still make those pins available and is nicely labeled. Hook the fan up to the +5V and Ground pins for the Red and Black wires respectively.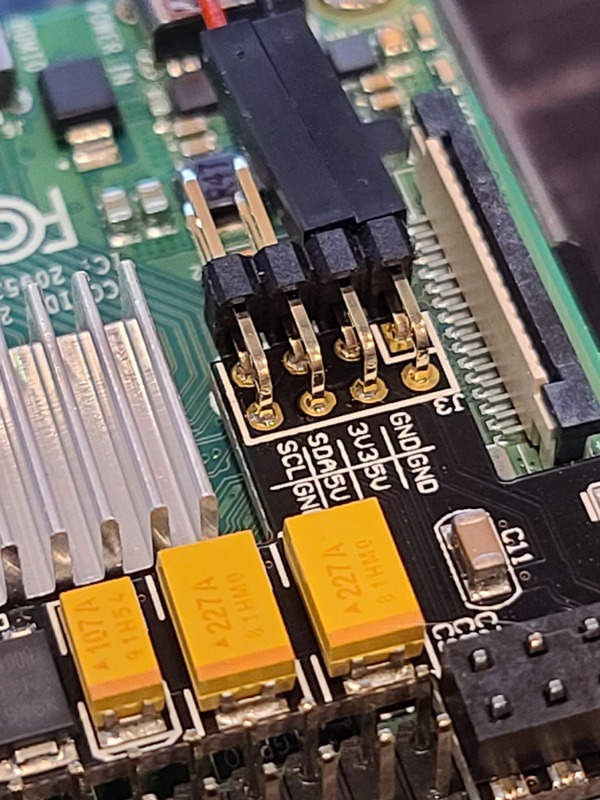
- The rest of the steps from here are the same.
I used some cable ties to clean everything up and here is the finished product!
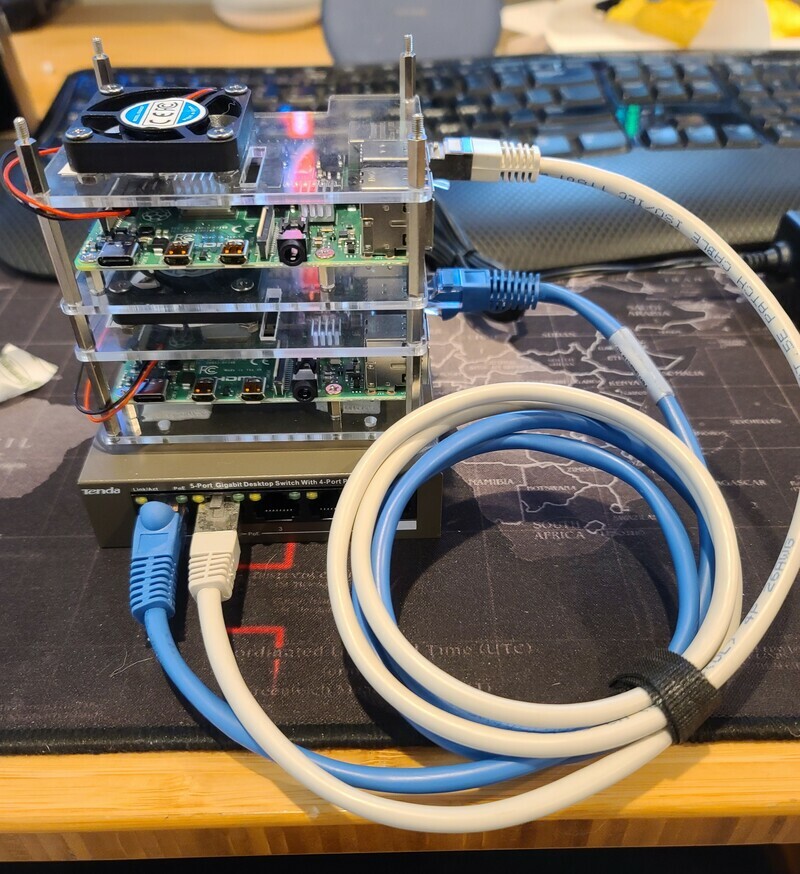
At this point, you will now have everything ready to begin setting up Kubernetes!
Getting the OS ready
All of my previous experience with Kubernetes had been using managed services like AKS, EKS, and GKS so I had a bit of research to do when I set off. At first, I tried using Raspberry OS. This seemed like the simplest and most common approach.
I followed the normal instructions for flashing the Pi but there were a few things I didn’t like about this approach. First, you can’t pre-configure a hostname or a static IP without booting the device up. This means that you either need to have it connected to a display or you need to create a ssh file in the boot volume to enable SSH and then try to figure out the dynamic IP.
This was annoying but not necessarily a nail in the coffin for this approach. What basically killed it for me is that you need to jump through some hoops to get DNS working in K3s when using Raspberry OS. I had gotten the first node working but the second one never was ever able to resolve any DNS from inside the pods.
Because of this I gave up on Raspberry OS and started over.
Enter k3OS
If you don’t know, k3OS is a Linux distro specifically designed to host K3s. The thing I like most about this is that the entire configuration is declared using a yaml file. This means you can fully preconfigure the image before ever booting the device.
Building Images
In my research, I found a script by Sjors Gielen that can generate k3OS images for Raspberry PI so all that you need to do is write the image to an SD card and boot it up.
To get started, just clone the repo at https://github.com/sgielen/picl-k3OS-image-generator.git.
To use it, you just need to collect the MAC address of each PI and create a yaml file for each one in the config/ folder like config/6A:4A:19:32:8A:50.yaml. The script uses the MAC address to map a configuration to a specific Raspberry Pi device.
Configuration with k3OS is extremely simple. For my first node, I used the following configuration:
# the hostname you want to use for the Pi
hostname: k3s-1

# a public key if you intend to use ssh to connect to the node. This is highly recommended since k3OS has no root user.
ssh_authorized_keys:
  - a-valid-ssh-key-from-your-machine

# Ethernet config
write_files:
  - path: /var/lib/connman/default.config
    content: |-
      [service_eth0]
      Type=ethernet
      IPv4=192.168.1.1/255.255.255.0/192.168.1.1
      IPv6=off
      Nameservers=192.168.1.1

k3OS:
  ntp_servers:
    - 0.us.pool.ntp.org
    - 1.us.pool.ntp.org

  dns_nameservers:
    - 192.168.1.1
    - 8.8.8.8
    - 1.1.1.1

  # We are going to disable servicelb and traefik and use some alternatives
  k3s_args:
    - server
    - "--cluster-init"
    - "--disable=traefik,servicelb"
If you want to know more about the config schema, you can see it here.
In my specific config, I also chose to remove servicelb which is the default load balancer. The reason for this is that servicelb only supports assigning Node IPS. I prefer each of pods to have their own IP address so I’m not forced to redirect web applications on port 80 to different ports so they don’t conflict on the node. I also did not deploy traefik as I will be addressing everything by IP instead of setting up DNS on my home network.
At this point, you can now run ./build-image.sh raspberrypi. This will generate an image named picl-k3OS-v0.10.0-raspberrypi.img. You can now use a tool like Balena Etcher to flash your image to the SD Card.
Go ahead and put the SD Card in your Pi after flashing it and plug it in to boot it. The image performs some tasks on first boot so it may take a few minutes for the Pi to come up and being responding to network requests.
Once the Pi is up, you will need to get the token to connect additional nodes. You can do this by running the command ssh rancher@192.168.1.1 sudo cat /var/lib/rancher/k3s/server/node-token. Be sure to replace the IP with the address you specified above. This will return a token that you will use in your next node config.
For any additional nodes you deploy, you can use the config below and just update the ip addresses and hostnames.
hostname: k3s-2
ssh_authorized_keys:
  - a-valid-ssh-key-from-your-machine

write_files:
  - path: /var/lib/connman/default.config
    content: |-
      [service_eth0]
      Type=ethernet
      IPv4=192.168.1.2/255.255.0.0/192.168.1.1
      IPv6=off
      Nameservers=192.168.1.1

k3OS:
  ntp_servers:
    - 0.us.pool.ntp.org
    - 1.us.pool.ntp.org

  dns_nameservers:
    - 192.168.1.1
    - 8.8.8.8
    - 1.1.1.1

  # This is an agent, not a server
  k3s_args:
    - agent

  token: token-from-your-ssh-call

  server_url: https://192.168.1.1:6443
The configuration for the agents are very similar to the server with 3 small changes.
- Under
k3s_args, we need to specify that this is an agent instead of a server. - You will need to add a token so the agent can connect to the first node.
- You need to add a server url for the first node so that the agent knows who to talk to.
Now, run ./build-image.sh raspberrypi again to build a new image with the config for the second node. Burn it to your second SD card using Balena Etcher again. Plug the card into the Raspberry PI and plug in the ethernet cable if using PoE or otherwise the power cable as well. The image should again take a couple minutes on the first boot but then be ready.
At this point, you should be able to ssh back into your first node and run kubectl get nodes again and see both nodes.

Final Setup
At this point you have a running Kubernetes Cluster on Raspberry Pi!
In order to run the final steps, you’ll want to get the credentials from the primary node. SSH into the node and run cat /etc/rancher/k3s/k3s.yaml. You will want to copy this to ~/.kube/config if you don’t have an existing one. If you do have an existing one, the only way I’ve found to merge these if manually by copying and pasting the individual sections in.
The last thing to do is add the MetalLB load balancer using these instructions.
For mine, I created a basic configmap with an address pool in my network. You can use whatever IP Addresses you have available.
# configmap.yaml
kind: ConfigMap
apiVersion: v1
metadata:
  name: config
data:
  config: |
    address-pools:
    - addresses:
      - 192.168.50.1/24
      name: default
      protocol: layer2
I then ran the following commands
kubectl apply -f https://raw.githubusercontent.com/metallb/metallb/v0.9.3/manifests/namespace.yaml

kubectl apply -f configmap.yaml -n metallb-system

kubectl apply -f https://raw.githubusercontent.com/metallb/metallb/v0.9.3/manifests/metallb.yaml

kubectl create secret generic -n metallb-system memberlist --from-literal=secretkey="$(openssl rand -base64 128)"
Conclusion
The steps I have outlined here were for deploying a Kubernetes cluster for my house but these same steps would easily for deploying an IOT Edge solution.
I hope this helps you. Please feel free to leave feedback or comments and let me know how it goes!
Comments